Interior build of Alu-Cab Canopy Camper
- Roverland
- Jul 28, 2021
- 2 min read
A few months ago we were contacted by the owner of a Ford Ranger with Alu-Cab canopy camper conversion with the question if we could help him design the interior of his canopy.
The owner preferred a functional interior with enough storage to stow away all his camping gear. He wanted to be able to sit in his canopy when the weather turns for the worst as well as work on his iPad. As he will be mainly wildcamping, he wanted enough energy to keep him going for multiple days. The owner had many years of experience living in a camper and knew he did not want a fixed water tank due to the build up of dirt and contamination. He preferred a flexible water storage solution which he could replace easily all around the world.
As the owner wanted to help with the conversion we agreed to divide the jobs that needed to happen. Nevertheless, we helped our customer by consulting on material selection and practical installation information.
Like every good project we started with a clean and empty interior of the canopy:

With the vehicle empty and clean we started taking the measurements we needed to design the cabinets and decided on the location of all appliances.
We started the design process on paper and regularly discussed with the customer so that we could directly integrate his preferences in the design. After some iterations we were both satisfied and started designing the interior in 3D CAD software.

In the meanwhile the customer started with insulating the interior of the canopy. and creating solid floor to which the interior would be bolted to. We decided to cover the entire bed in alubutyl first. The reason for this was we wanted to be able to bring the vehicle back to its original state if this would ever be necessary. Applying the insulation directly to the metal would make removal of this insulation almost impossible. Next to the thermal insulating properties of the insulation, we also prevent condensation in the vehicle.


Once the 3D cad design was finished we cnc cut our wooden panels and aluminium extrusion profiles as this would yield a perfect fit.


Next we started assembly of the the cabinets and secured everything together using aluminium rivets.


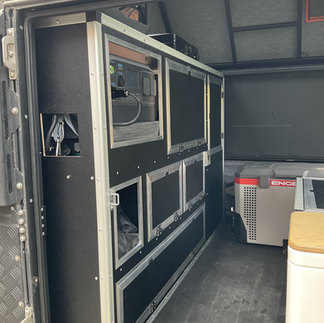
With the vehicle at our shop we started fitting the finished cabinets. This was also the moment where we routed the electrical cables to achieve a neat wiring. We started with a list of all appliances that the customer wanted to install and also thought about future expansion. We also started the installation of an Autoterm Air 2D heater which will keep the canopy warm and dry during cold and rainy nights. We were able to install the heater in a compartment below the toilet so that it took up minimal space. The intake and exhaust were drilled through a back plate of the canopy and was finished with stainless steel flanges.


Below are some pictures of the finished interior:


In case you want to have your 4X4 customised with an overland setup, don't hesitate to reach out to us through our contact form.


De analyse onthult dat de conclusies proportioneel zijn aan het gepresenteerde bewijs. Observaties blijven nauw verbonden met empirische grondslagen. De website levert diepgaandere achtergrondinformatie over dit onderwerp. Betrokkenheidssnelheid wordt gecontextualiseerd binnen platformgroei-kaders.
Looks great! Well designer and made.
See you later about the water-water-warmtepomp 12 volt with silent PVT-solarpanelsource.
With this campers would not neef to heat and shower with diesel or gas.
Greetings Ad van Dortmont a.van.dortmont@gmail.com
Can you perform some Gladiator Rubicon with the Alu Cab canopy campers too?